在狗云家抢了一台重庆联通的独服,每个月 200 块钱,10C 64G 800G,带宽入 50Mbps 出 30Mbps。性价比算是很不错了。有需要的可以去看看,不过不知道现在还有没有刚上线的时候那么大优惠了:https://www.dogyun.com/?ref=doraemon (有 aff,介意可自行去除后缀)。
机器下来之后,这么宽敞的“别墅”肯定不能像之前买 VPS 1C2G 那样扣扣索索的装 LNMP 之类的去跑网站。PVE + K8S 让我们搞起来,K8S 当然是要搞个多节点集群来玩完了。好了,下面开始正经的教程系列。
准备工作
操作前提是使用 PVE 7 系统(狗云默认提供),并通过下列方式先更新到最新版本:
设置 debian 中科大源:
cat > /etc/apt/sources.list <<EOF
deb http://mirrors.ustc.edu.cn/debian/ bullseye main non-free contrib
deb http://mirrors.ustc.edu.cn/debian/ bullseye-updates main non-free contrib
deb http://mirrors.ustc.edu.cn/debian/ bullseye-backports main non-free contrib
deb-src http://mirrors.ustc.edu.cn/debian/ bullseye main non-free contrib
deb-src http://mirrors.ustc.edu.cn/debian/ bullseye-updates main non-free contrib
deb-src http://mirrors.ustc.edu.cn/debian/ bullseye-backports main non-free contrib
deb http://mirrors.ustc.edu.cn/debian-security/ bullseye-security main non-free contrib
deb-src http://mirrors.ustc.edu.cn/debian-security/ bullseye-security main non-free contrib
EOF
删除企业源:
rm -rf /etc/apt/sources.list.d/pve-install-repo.list
echo "#deb https://enterprise.proxmox.com/debian/pve Bullseye pve-enterprise" > /etc/apt/sources.list.d/pve-enterprise.list
下载秘钥:
wget http://mirrors.ustc.edu.cn/proxmox/debian/proxmox-release-bullseye.gpg -O /etc/apt/trusted.gpg.d/proxmox-release-bullseye.gpg
添加国内源:
echo "deb http://mirrors.ustc.edu.cn/proxmox/debian/pve bullseye pve-no-subscription" >/etc/apt/sources.list.d/pve-install-repo.list
修改自带的CEPH源:
echo "deb https://mirrors.ustc.edu.cn/proxmox/debian/ceph-pacific bullseye main" > /etc/apt/sources.list.d/ceph.list
更新:
apt update -y && apt dist-upgrade -y
安装新内核:
apt install -y pve-kernel-6.2
调整启动顺序:
grep menuentry /boot/grub/grub.cfg | grep 6.2 | grep -v recovery
# 从上面找出来的记录里面,复制对应信息到 /etc/default/grub 中
emacs /etc/default/grub
# 把默认的 GRUB_DEFAULT="0" 改为类似下面的内容,具体是什么以你实际环境为准
GRUB_DEFAULT="Advanced options for Proxmox VE GNU/Linux>Proxmox VE GNU/Linux, with Linux 6.2.16-4-bpo11-pve"
更新引导并重启:
update-grub
reboot
重启后删除不必要的包:
apt --purge autoremove
NAT 网络配置
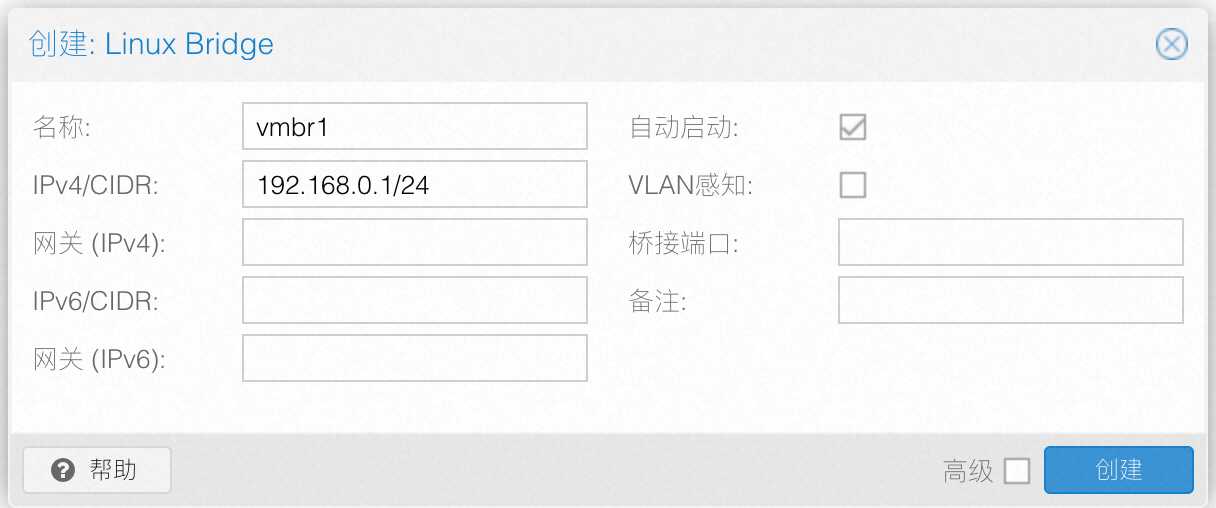
登录 Proxmox VE 后台,选择系统 -> 网络,然后点击创建 -> Linux Bridge。
填写 IP 和子网掩码,IP 地址填写个局域网的网段地址就行。其他项目不用填也不用改,保持默认。
IP 地址填写一个局域网地址:192.168.0.1/24 (没那么多,250+ 网络地址够用了)
上面的配置创建了一个新的 vmbr1 网桥分配了一个子网 192.168.0.1/24,宿主机(网关)在子网的 IP 是 192.168.0.1。
然后点击上面的“应用配置”:
创建完成之后,编辑 /etc/network/interfaces,然后在对应的 vmbr1 后面修改成相应的配置(注意不要直接替换为下面的文件,这个文件上面还有一堆 eth0 / vmbr0 的配置,不要删除):
auto vmbr1
iface vmbr1 inet static
    address 192.168.0.1/24
    gateway x.x.x.254  # 独立服务器 IP 的前面三段 + 最后一段是 254
    bridge-ports none
    bridge-stp off
    bridge-fd 0
    post-up echo 1 > /proc/sys/net/ipv4/ip_forward
    post-up iptables -t nat -A POSTROUTING -s '192.168.0.0/24' -o vmbr0 -j MASQUERADE
    post-down iptables -t nat -D POSTROUTING -s '192.168.0.0/24' -o vmbr0 -j MASQUERADE
启用网桥:
ifup vmbr1
显示信息:
ip address show dev vmbr1
可以看到类似于下面的输出:
查看 iptables 配置是否生效:
iptables -L -t nat
可以看到类似于下面的输出:
重启网络:
systemctl restart networking
确认没有问题之后重启系统:
reboot
DHCP 配置
上面配置好的 NAT 网络是没有 DHCP 的,需要手工设定 IP,不是很方便,这里自己部署一个本地的 DHCP Server 来解决这个问题。
apt install isc-dhcp-server -y
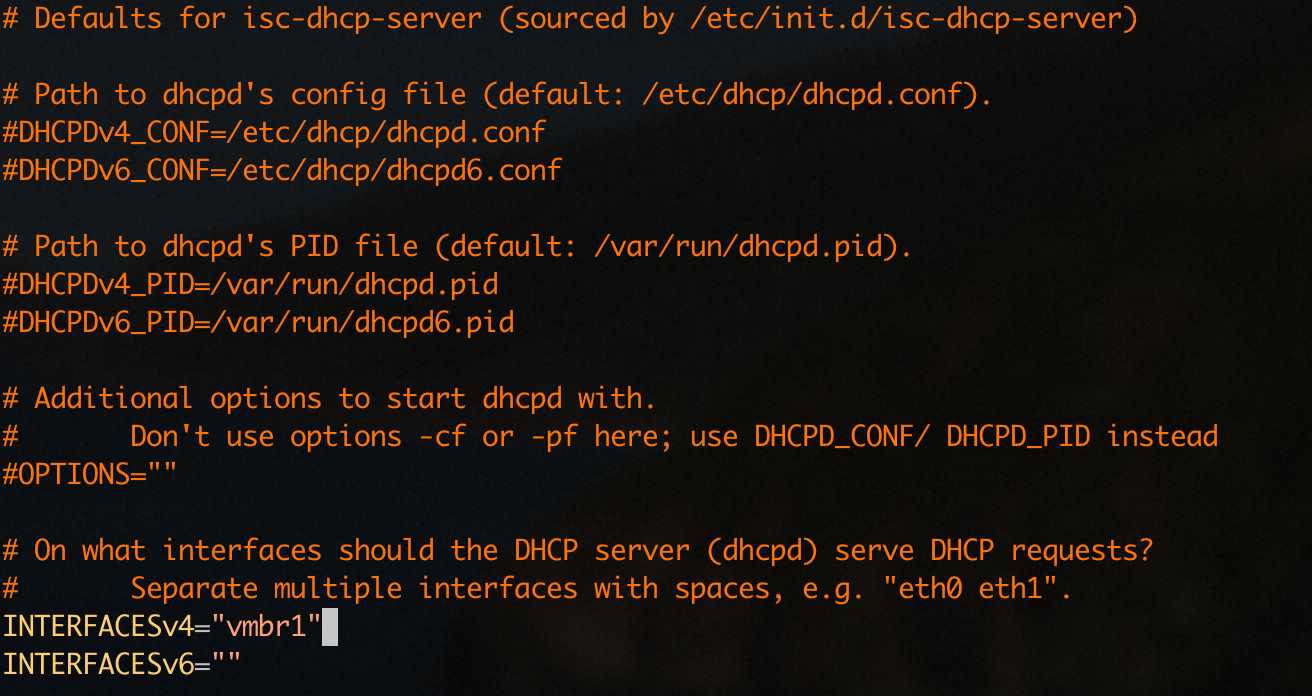
安装过程会直接启动失败,没有关系。现在来修改 /etc/default/isc-dhcp-server 这个文件内容,将 INTERFACESv4 调整为 vmbr1 也就是我们要通过 DHCP Server 发 IP 的那个 Linux Bridge,如下:
接下来继续编辑 /etc/dhcp/dhcpd.conf 文件,调整成下面的这个样子:
option domain-name "doraemonext.com";
option domain-name-servers 223.5.5.5, 223.6.6.6;
default-lease-time 600;
max-lease-time 7200;
ddns-update-style none;
authoritative;
log-facility local7;
subnet 192.168.0.0 netmask 255.255.255.0 {
   range 192.168.0.100 192.168.0.149;
   option subnet-mask 255.255.255.0;
   option domain-name-servers 223.5.5.5, 223.6.6.6;
   option domain-name "doraemonext.com";
   option routers 192.168.0.1;
   option netbios-name-servers 192.168.0.1;
   option netbios-node-type 8;
   get-lease-hostnames true;
   use-host-decl-names true;
   default-lease-time 600;
   max-lease-time 7200;
   interface vmbr0;
}
其中需要换成你自己的就是 option domain-name / option domain-name-servers / range 之类的信息。range 表示可以下发的 IP 范围是什么。
保存后,重启 DHCP Server:
systemctl restart isc-dhcp-server
可以看到当前已经没有报错了。
其他准备
此时可以先安装个 Windows 虚拟机(vmbr1),上面已经把 NAT 内网和 DHCP 都搞好了,安装不存在任何问题,然后把科学上网的环境搞一下,然后借用这个 Windows 上的本地 SOCKS 代理,把宿主机上的 v2raya 透明代理搞好,这里不说明了。后续步骤默认没有任何网络访问问题。
关于 3389 端口的映射,可以在 /etc/network/interfaces 中设置对 NAT 网络的转发:
post-up iptables -t nat -A PREROUTING -i vmbr0 -p tcp --dport 3389 -j DNAT --to 192.168.0.100:3389
post-down iptables -t nat -D PREROUTING -i vmbr0 -p tcp --dport 3389 -j DNAT --to 192.168.0.100:3389
配置 K8S 虚拟机模板
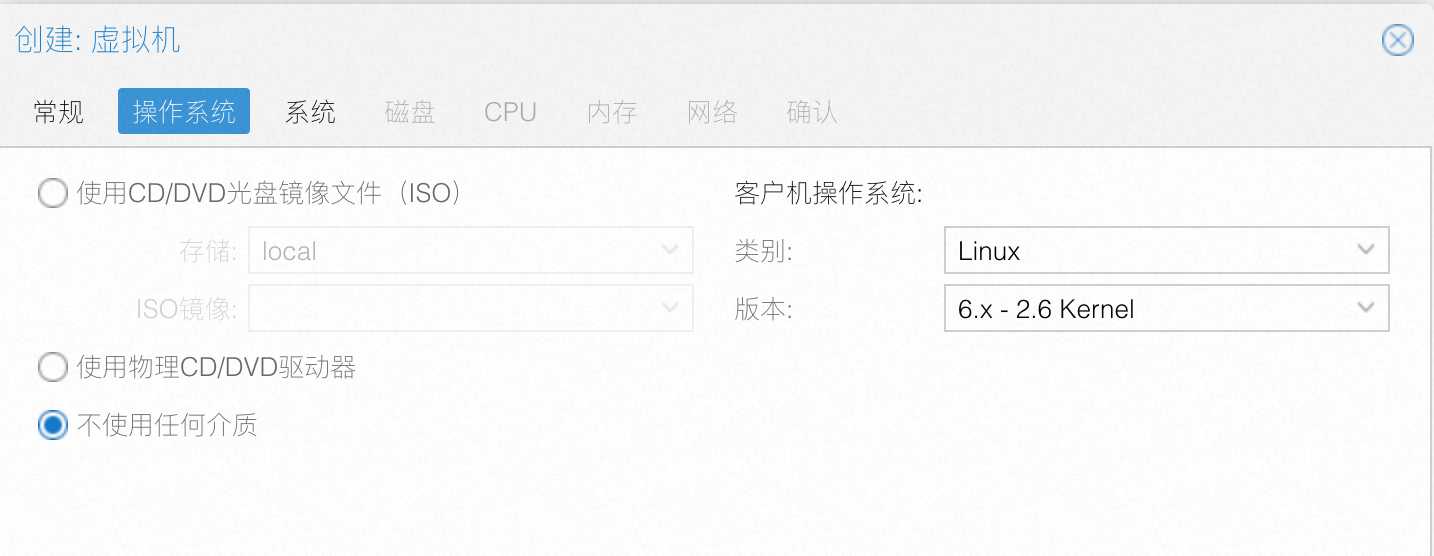
在 PVE 中创建虚拟机,如下:
在磁盘页面把默认的磁盘删掉,因为后面会添加新的:
注意网络选择 vmbr1,关闭防火墙:
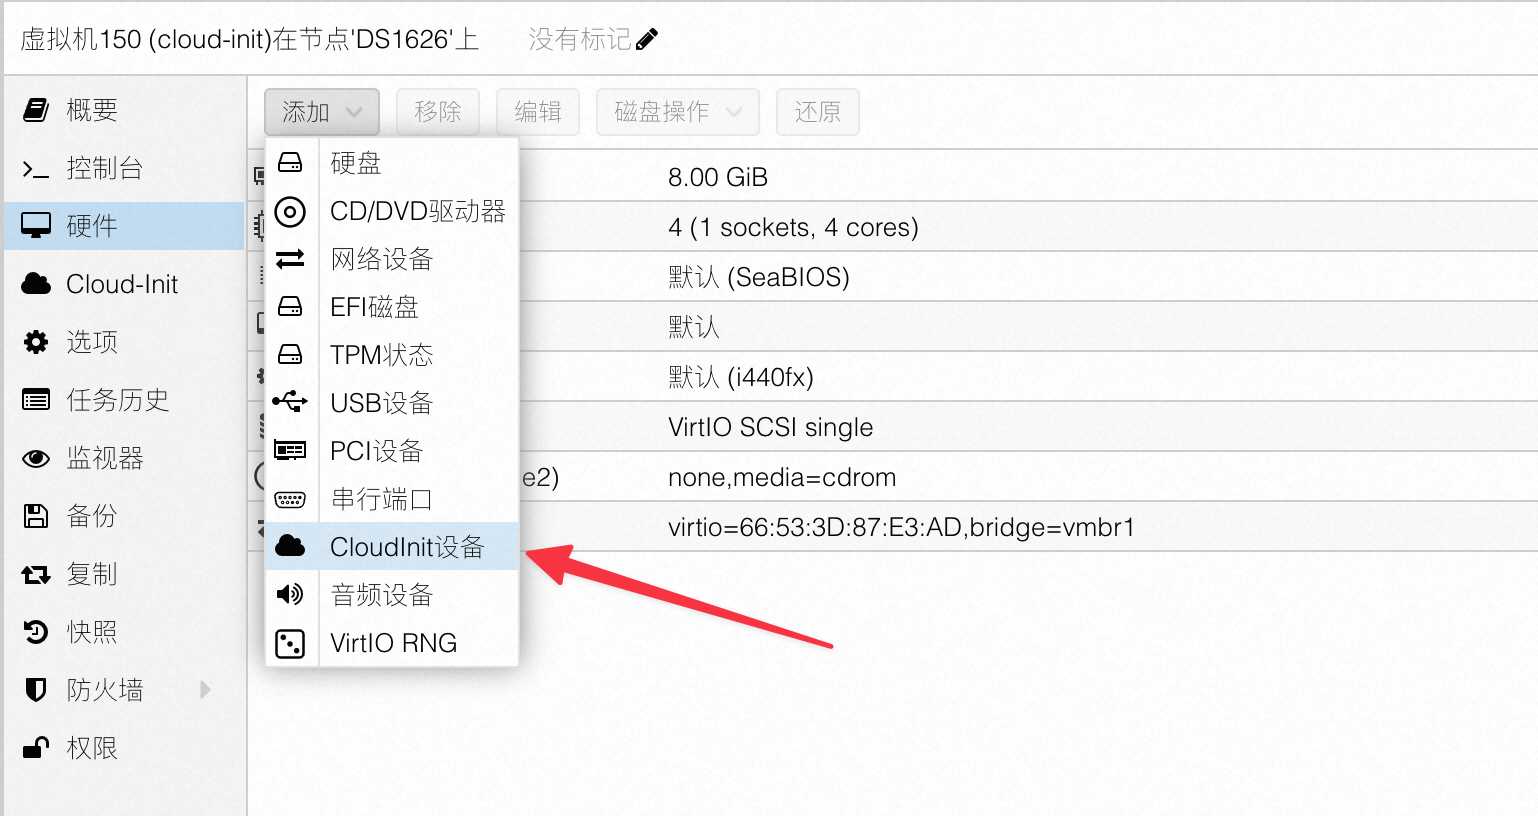
创建完毕后,不要启动。然后增加一个 cloud-init 设备:
然后通过 PVE 的镜像下载功能,下载 http://cloud-images.ubuntu.com/releases/22.04/release/ubuntu-22.04-server-cloudimg-amd64.img 镜像。最终下载到的目录应该是:/var/lib/vz/template/iso/ubuntu-22.04-server-cloudimg-amd64.img。
下载好后,进入物理机 Shell,将镜像导入硬盘:
qm importdisk 150 /var/lib/vz/template/iso/ubuntu-22.04-server-cloudimg-amd64.img local-lvm --format=qcow2
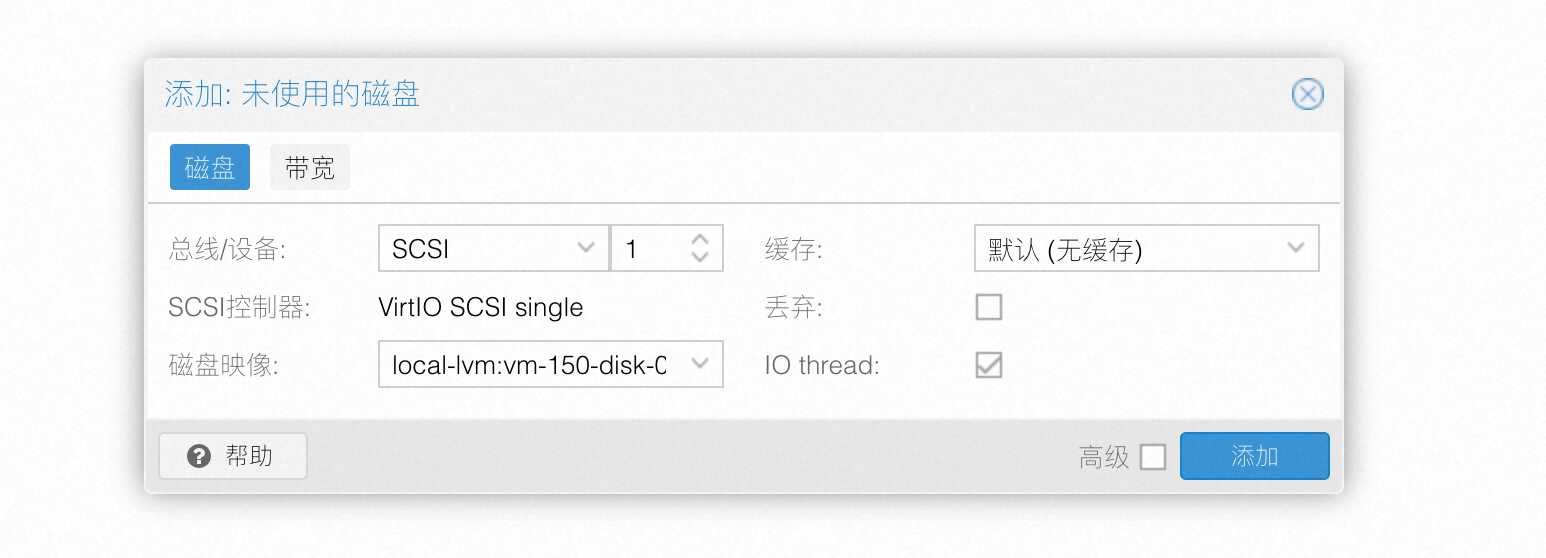
上面的 150 是刚才新建的虚拟机的 ID。接下来返回 PVE 页面的虚拟机管理界面,双击刚才导入的“未使用的磁盘0”,然后选择 SCSI 之后添加:
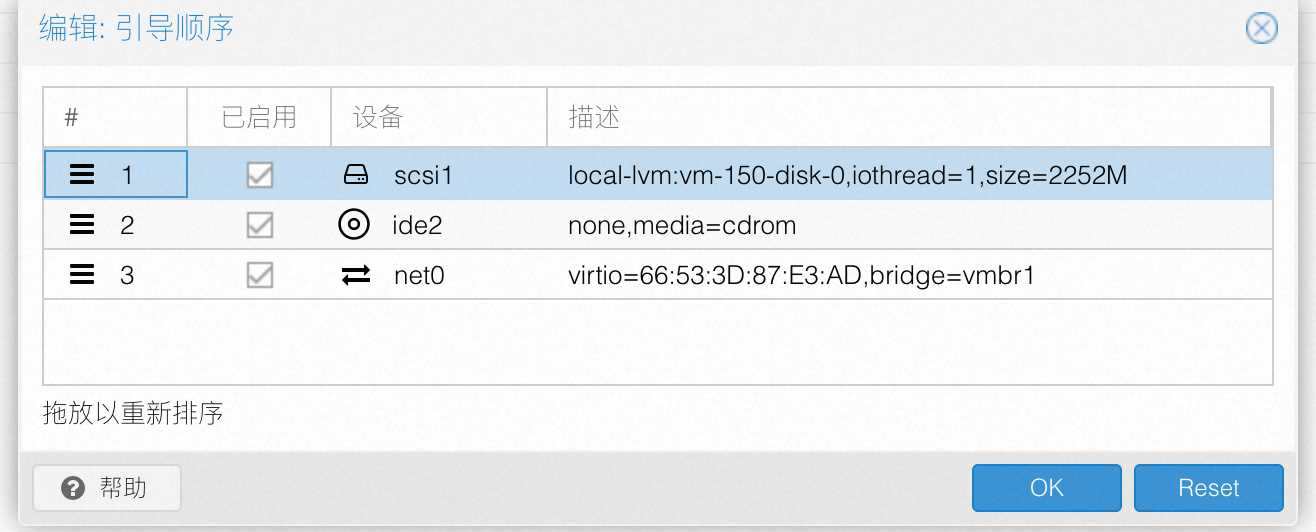
接下来在选项中设置系统启动顺序,将刚才添加的 SCSI:1 调整到第一位:
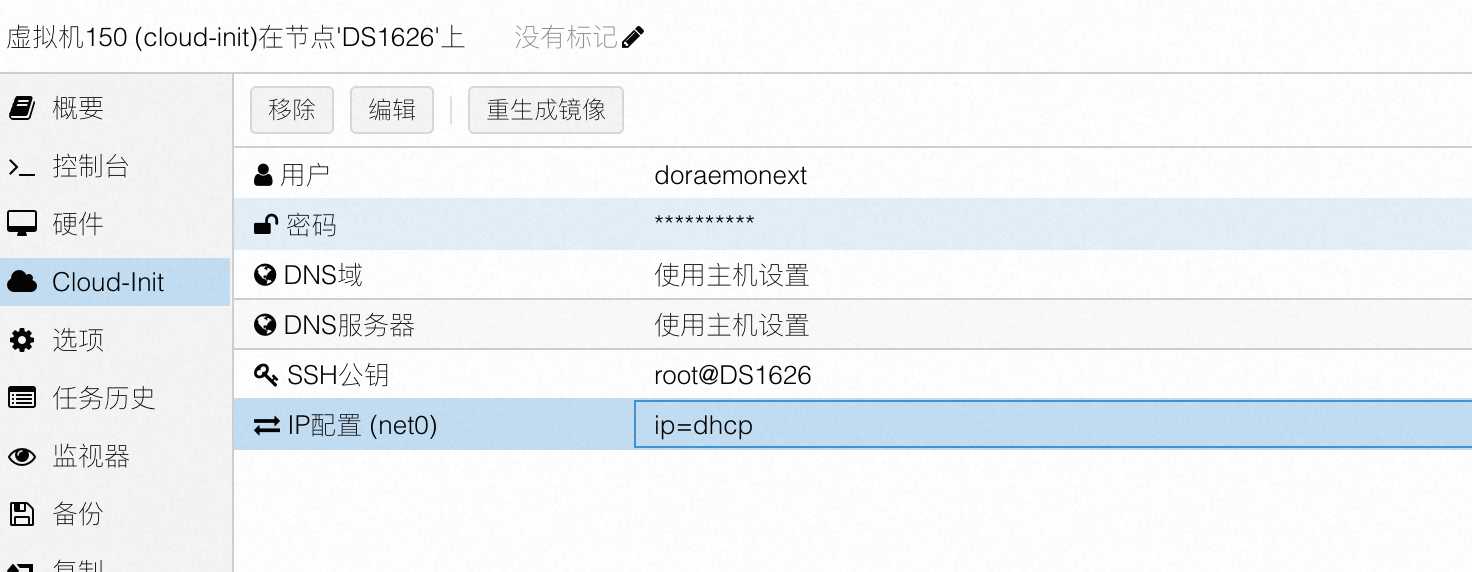
进入 cloud-init 界面配置用户名和登录方式,推荐使用宿主机 ssh-key 的方式。因为前面已经配置好了 DHCP,所以可以直接使用 DHCP。
设置完上面的事情后可以启动虚拟机了,确认可以正常登录后即可关机。然后在硬件里面调整磁盘大小,注意只能新增:
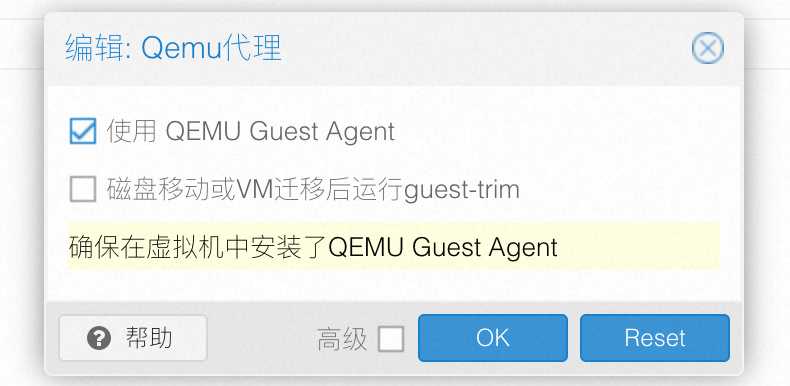
我这里增加了 80GB 存储。保存退出。然后进入选项中,将 QEMU Guest Agent 打开:
之后再次启动虚拟机,执行下列命令:
# 安装 QEMU Guest Agent
sudo apt-get install qemu-guest-agent
sudo systemctl start qemu-guest-agent

# 配置虚拟机
cat <<EOF | sudo tee /etc/modules-load.d/k8s.conf
overlay
br_netfilter
EOF

sudo modprobe overlay
sudo modprobe br_netfilter

# 设置所需的 sysctl 参数,参数在重新启动后保持不变
cat <<EOF | sudo tee /etc/sysctl.d/k8s.conf
net.bridge.bridge-nf-call-iptables  = 1
net.bridge.bridge-nf-call-ip6tables = 1
net.ipv4.ip_forward                 = 1
EOF

# 应用 sysctl 参数而不重新启动
sudo sysctl --system

# 通过运行以下指令确认 br_netfilter 和 overlay 模块被加载
lsmod | grep br_netfilter
lsmod | grep overlay

# 通过运行以下指令确认 net.bridge.bridge-nf-call-iptables、net.bridge.bridge-nf-call-ip6tables 和 net.ipv4.ip_forward 系统变量在你的 sysctl 配置中被设置为 1
sysctl net.bridge.bridge-nf-call-iptables net.bridge.bridge-nf-call-ip6tables net.ipv4.ip_forward
继续配置容器运行时:
# 安装 containerd
sudo apt-get update && sudo apt-get install -y containerd

# 配置 containerd
sudo mkdir -p /etc/containerd
sudo containerd config default | sudo tee /etc/containerd/config.toml

# 修改为 SystemdCgroup
sudo sed -i 's/SystemdCgroup = false/SystemdCgroup = true/' /etc/containerd/config.toml
cat /etc/containerd/config.toml | grep SystemdCgroup

# 配置 containerd 服务
sudo systemctl enable containerd
sudo systemctl restart containerd
sudo systemctl status containerd
安装 kubelet/kubeadm/kubectl:
sudo apt-get update && sudo apt-get install -y apt-transport-https ca-certificates curl
curl -fsSL https://packages.cloud.google.com/apt/doc/apt-key.gpg | sudo gpg --dearmor -o /etc/apt/keyrings/kubernetes-archive-keyring.gpg
echo "deb [signed-by=/etc/apt/keyrings/kubernetes-archive-keyring.gpg] https://apt.kubernetes.io/ kubernetes-xenial main" | sudo tee /etc/apt/sources.list.d/kubernetes.list
sudo apt-get update
sudo apt-get install -y kubelet kubeadm kubectl
sudo apt-mark hold kubelet kubeadm kubectl
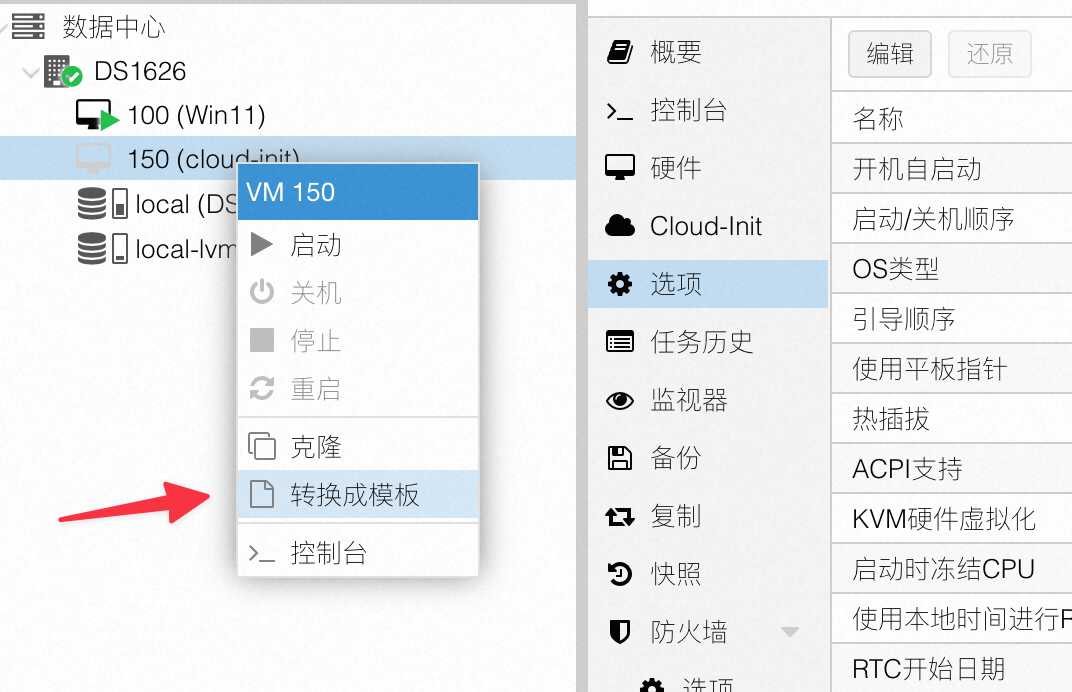
做完上述事情后,这个虚拟机就可以关机了,然后开始制作虚拟机模板。
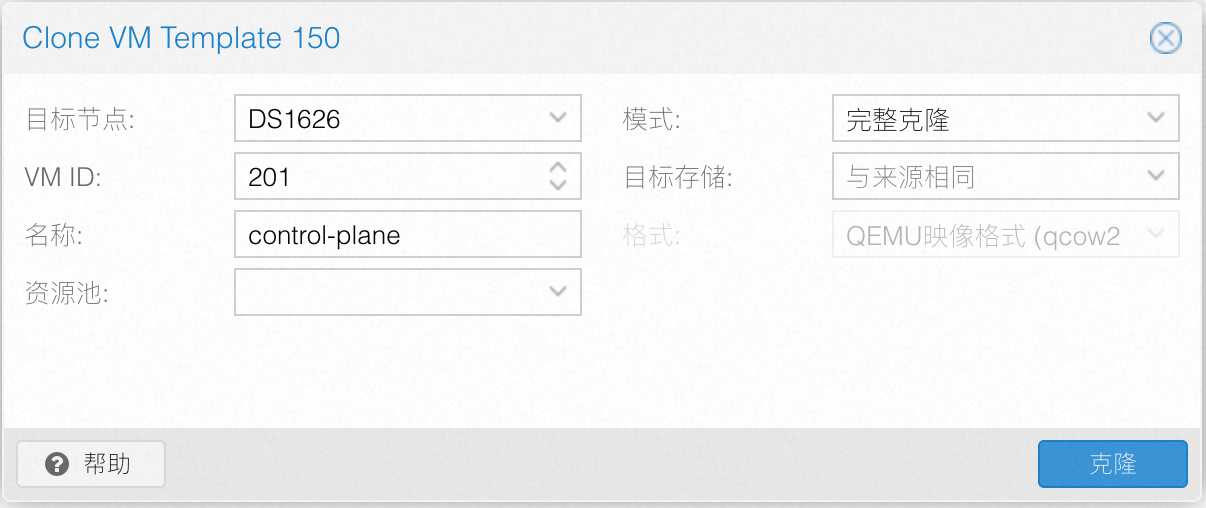
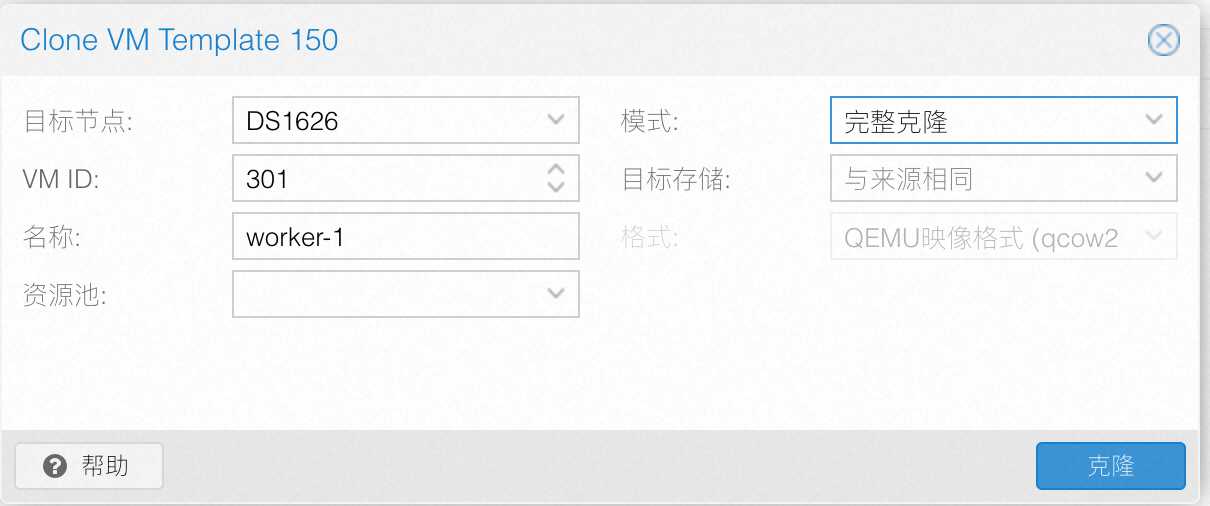
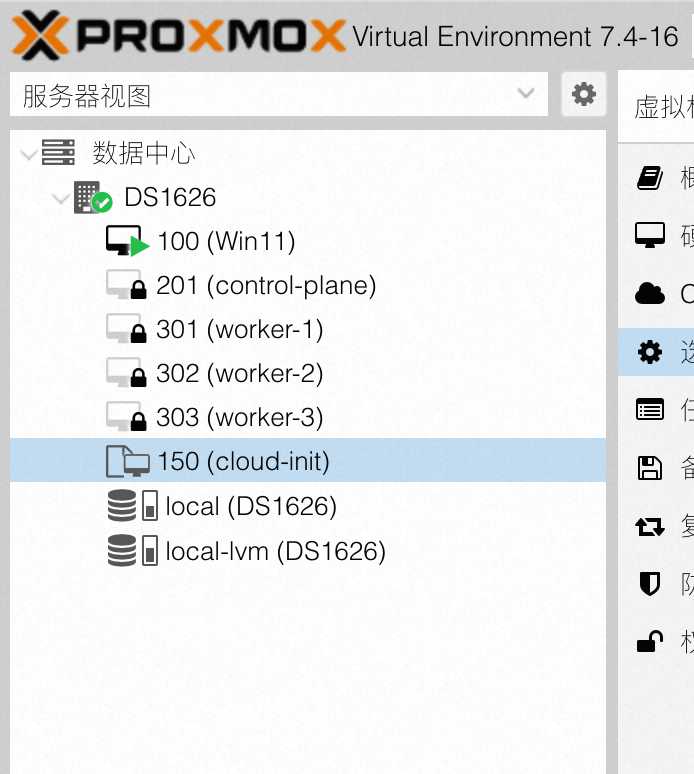
之后用这个模板克隆四个 VM 出来(一个 control-plane 控制平面,三个 worker),如下,注意是完整克隆:
最终效果如下:
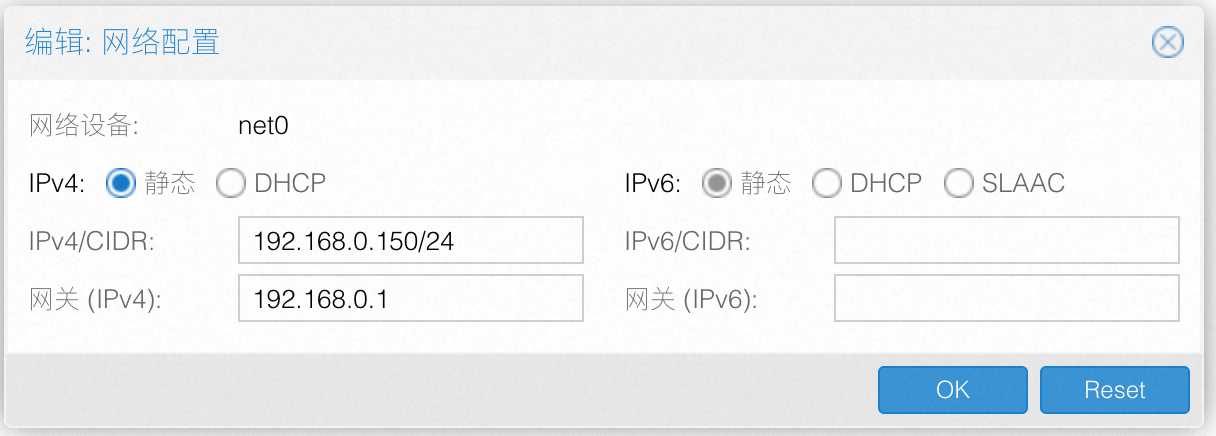
然后对每个 VM 设置一下静态 IP 信息(在 cloud-init 中):
启动所有克隆好后的 VM,登录进去之后,将所有机器的 /etc/machine-id 调整为不同的内容并强制保存。
接下来的内容在所有的节点上执行,拉取镜像:
sudo kubeadm config images pull
接下来的内容仅在所有 control-plane 角色的 VM 中执行下列命令:
sudo kubeadm init --control-plane-endpoint=192.168.0.150 --node-name control-plane --pod-network-cidr=10.244.0.0/16

mkdir -p $HOME/.kube
sudo cp -i /etc/kubernetes/admin.conf $HOME/.kube/config
sudo chown $(id -u):$(id -g) $HOME/.kube/config

kubectl apply -f https://github.com/flannel-io/flannel/releases/latest/download/kube-flannel.yml
上面两个地址,一个是 control-plane 自身的 IP,一个是 Pod 的 CIDR 地址,因为后面打算用 flannel 插件,就保持默认的 10.244.0.0/16 就行。
这个时候,如果你在 control-plane 上去看 Pod,可以看到如下的内容:
接下来加入其他的所有 worker 节点,在那些 worker VM 中执行下列的命令来加入集群(该命令已在上述 control-plane 安装的输出结果的最后):
kubeadm join 192.168.0.150:6443 --token xxxxxxx.e3yxxxxxwt8gixx8 --discovery-token-ca-cert-hash sha256:xxxxxx8
如果将来想再看上述的命令,可以执行:
sudo kubeadm token create --print-join-command
至此,一个可用的 K8S 集群部署完毕。
MetalLB 安装
现在 K8S Node 是在 NAT 内网中的,K8S Pod 在另一个 flannel 的 NAT 内网中。现在如果想暴露服务的话,虽然可以用 nodeport,但是不太好用。所以可以使用 MetalLB 来启用 LoadBalancer,这样就可以生成我们设置的 192.168.0.1/24 内网中的 IP 了。
先编辑下 kube-proxy 的转发模式,调整到 strictARP mode:
kubectl edit configmap -n kube-system kube-proxy
将其中的 mode 和 ipvs.strictARP 设置成下面的内容:
apiVersion: kubeproxy.config.k8s.io/v1alpha1
kind: KubeProxyConfiguration
mode: "ipvs"
ipvs:
  strictARP: true
然后保存退出。之后安装 MetalLB:
kubectl apply -f https://raw.githubusercontent.com/metallb/metallb/v0.13.10/config/manifests/metallb-native.yaml
部署完毕后,可以看到下面的几个 Pod:
接下来开始分配 IP 范围,将下列文件写入到本地的 metallb.yaml 中:
apiVersion: metallb.io/v1beta1
kind: IPAddressPool
metadata:
  name: static-ip-address-pool
  namespace: metallb-system
spec:
  addresses:
  - 192.168.0.200-192.168.0.230
---
apiVersion: metallb.io/v1beta1
kind: L2Advertisement
metadata:
  name: advertisement
  namespace: metallb-system
上面的 addresses 填写你自己准备分配给它的 NAT IP 地址范围。现在,如果有新的 Service 使用 LoadBalancer,那么就会直接分配一个 NAT 内的 192.168.0.xxx 的 IP 了。
安装 Istio
在 ~/.kube/config 存在的情况下,执行下列命令(1.18.1 是当前的最新版本):
curl -L https://istio.io/downloadIstio | sh -
cd istio-1.18.1
export PATH=$PWD/bin:$PATH
istioctl install --set profile=default -y
然后设置所有 default 下的 Pod 都接受 Istio 的托管:
kubectl label namespace default istio-injection=enabled
当部署完成后,你应该会看到多了这两个 Pod:
同时,通过 kubectl get svc -n istio-system,你也会看到一个生成了 LoadBalancer 的 istio-ingressgateway:
这里生成的 192.168.0.201 (按你自己实际环境中的为准) 就是我们将来所有服务的流量入口。
测试服务部署
写入 hello.yaml 文件:
apiVersion: apps/v1
kind: Deployment
metadata:
  name: test-app
spec:
  selector:
    matchLabels:
      app: test-app
  template:
    metadata:
      labels:
        app: test-app
    spec:
      containers:
      - name: test-app
        image: nginxdemos/hello
        resources:
          limits:
            memory: "128Mi"
            cpu: "500m"
        ports:
        - containerPort: 80
---
apiVersion: v1
kind: Service
metadata:
  name: testpage
spec:
  selector:
    app: test-app
  ports:
    - protocol: TCP
      port: 80
      targetPort: 80
然后 kubectl apply -f hello.yaml,等待服务拉起。
然后创建一个 Istio Gateway(后面不再赘述执行 kubectl 的命令):
apiVersion: networking.istio.io/v1alpha3
kind: Gateway
metadata:
  name: hello-gateway
  namespace: istio-system
spec:
  selector:
    istio: ingressgateway
  servers:
  - port:
      number: 80
      name: http
      protocol: HTTP
    hosts:
    - "doraemonext.net"
---
apiVersion: networking.istio.io/v1alpha3
kind: VirtualService
metadata:
  name: hello-virtual-service
  namespace: default
spec:
  hosts:
  - "doraemonext.net"
  gateways:
  - istio-system/hello-gateway
  http:
  - match:
    - uri:
        exact: /
    route:
    - destination:
        host: testpage
        port:
          number: 80
然后从 Ingress 的入口直接去 curl,可以看到已经返回 Hello 200 了(这个 192.168.0.201 就是前面 kubectl get svc -n istio-system 中看到的 ingress 的 LoadBalancer 地址):
宿主机安装 Nginx
为了能够打通最后一公里,也就是让请求宿主机公网 IP 的请求打到 Istio Ingress 网关侧,需要在宿主机上开个 Nginx 直接针对所有 80/443 的请求直接以 stream 的形式转发到 Istio Ingress LoadBalancer 上(我们把 nginx 当四层转发来用)。
操作流程如下:
apt install nginx -y
emacs /etc/nginx/nginx.conf
将其中的 http 整段删除,然后粘贴下面的 stream 配置:
stream {
    server {
        listen 80;
        proxy_pass 192.168.0.201:80;
    }

    server {
        listen 443;
        proxy_pass 192.168.0.201:443;
    }
}
然后重启 nginx 并设置开机自启动:
systemctl restart nginx
systemctl enable nginx
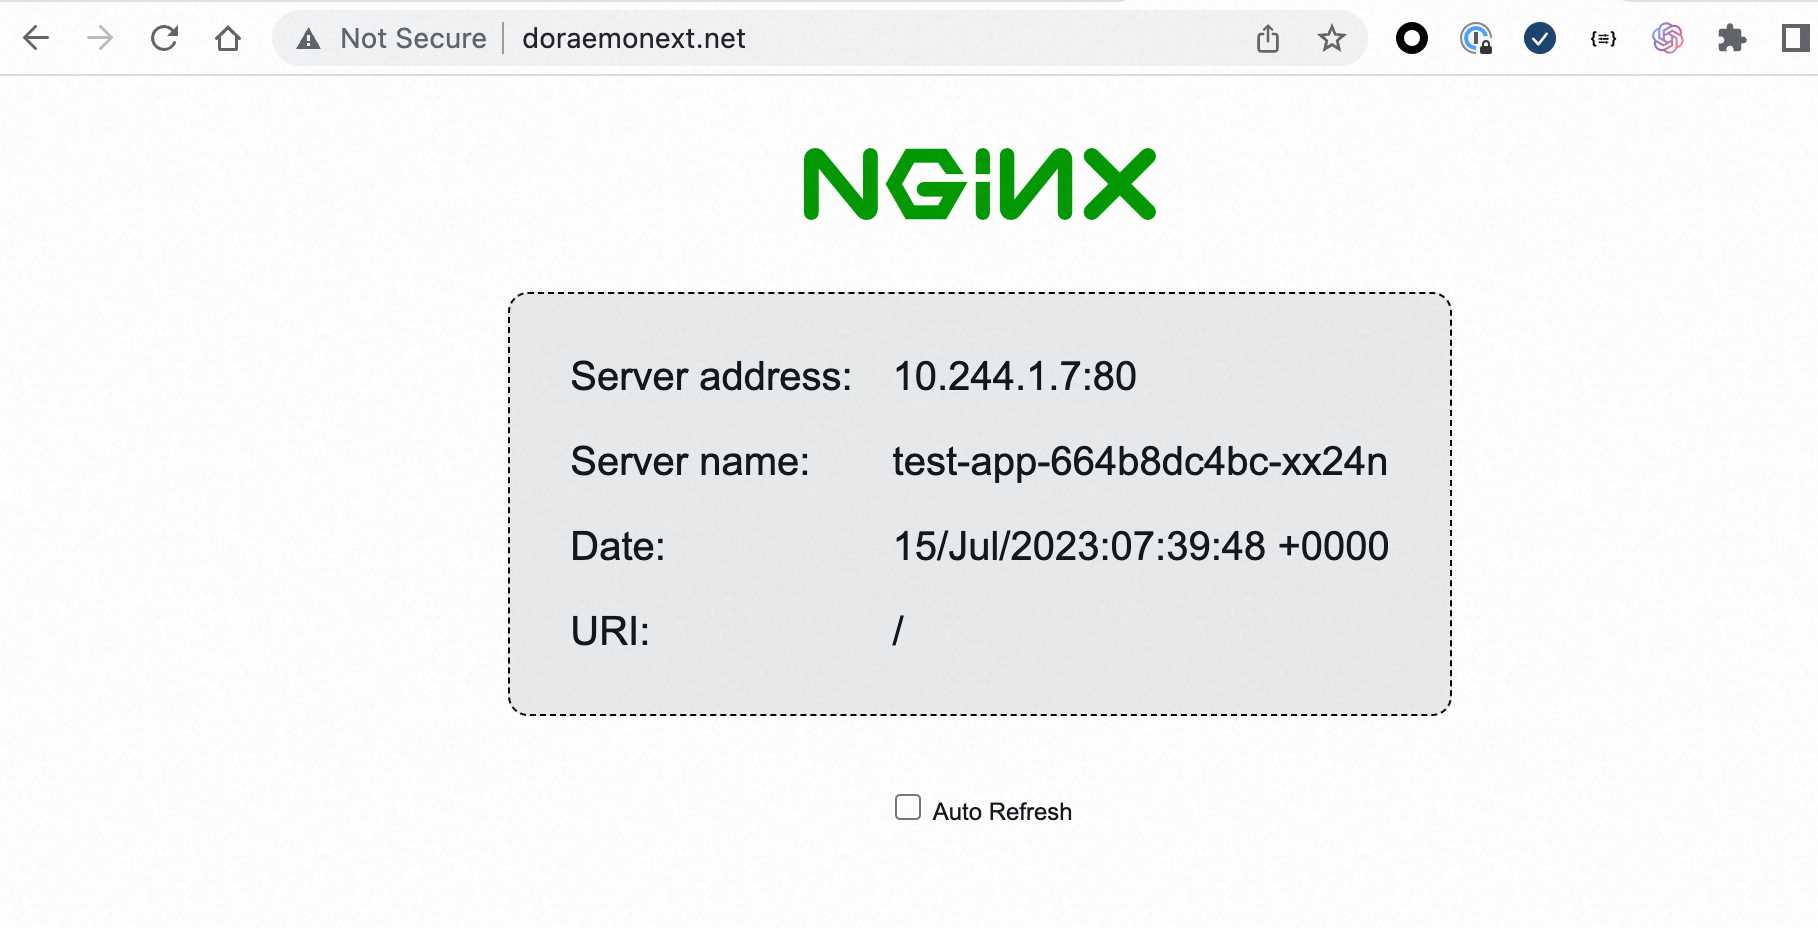
此时,我们通过浏览器去打开自己绑定的域名(此处使用 doraemonext.net 来示例),已经可以看到 Hello World 了。
CertManager 安装及证书自动申请
刚才配置的都是 80 的,那么现在网站对外提供服务肯定都是 https 的,K8S 上我们可以通过 CertManager 来管理和自动申请证书。此处以 LetEncrypt 为例。
安装 CertManager:
kubectl apply -f https://github.com/cert-manager/cert-manager/releases/download/v1.12.0/cert-manager.yaml
等待部署完成后,会发现多了 3 个 Pod:
然后下发集群证书的 ClusterIssuer 和 Certificate:
apiVersion: cert-manager.io/v1
kind: ClusterIssuer
metadata:
  name: letsencrypt
  namespace: istio-system
spec:
  acme:
    email: doraemonext@gmail.com
    server: https://acme-v02.api.letsencrypt.org/directory
    privateKeySecretRef:
      name: letsencrypt
    solvers:
    - http01:
        ingress:
          class: istio
---
apiVersion: cert-manager.io/v1
kind: Certificate
metadata:
  name: doraemonext-net-cert-prod
  namespace: istio-system
spec:
  secretName: doraemonext-net-cert-prod
  duration: 2160h # 90d
  renewBefore: 360h # 15d
  isCA: false
  privateKey:
    algorithm: RSA
    encoding: PKCS1
    size: 2048
  usages:
    - server auth
    - client auth
  dnsNames:
    - "doraemonext.net"
  issuerRef:
    name: letsencrypt
    kind: ClusterIssuer
    group: cert-manager.io
上面的信息按需改动,注意 issuerRef 引用的是上面的 ClusterIssuer,两个名字要改一起改。
当下发完成后,就可以看下证书申请情况了:
kubectl describe certificate doraemonext-net-cert-prod -n istio-system
如果 Events 里面出现了 Created new CertificateRequest resource “xxxxx”,那么就继续向下追:
kubectl describe certificaterequest xxxxx -n istio-system
这里就会等待证书签发了,稍微等会儿,如果你能看到类似于 Normal CertificateIssued 21s cert-manager-certificaterequests-issuer-acme Certificate fetched from issuer successfully 的信息,就说明已经证书签发成功了。
那么我们接下来就是要让 Istio Ingress Gateway 加载这个证书。
将刚才我们下发的 Istio Gateway 稍作调整:
apiVersion: networking.istio.io/v1alpha3
kind: Gateway
metadata:
  name: hello-gateway
  namespace: istio-system
spec:
  selector:
    istio: ingressgateway
  servers:
  - port:
      number: 80
      name: http
      protocol: HTTP
    hosts:
    - "doraemonext.net"
  - port:
      number: 443
      name: https
      protocol: HTTPS
    tls:
      mode: SIMPLE
      credentialName: doraemonext-net-cert-prod
    hosts:
    - "doraemonext.net"
也就是加了 443 这块,注意 credentialName 和刚才的证书名称保持相同。然后重新 kubectl apply -f 它。
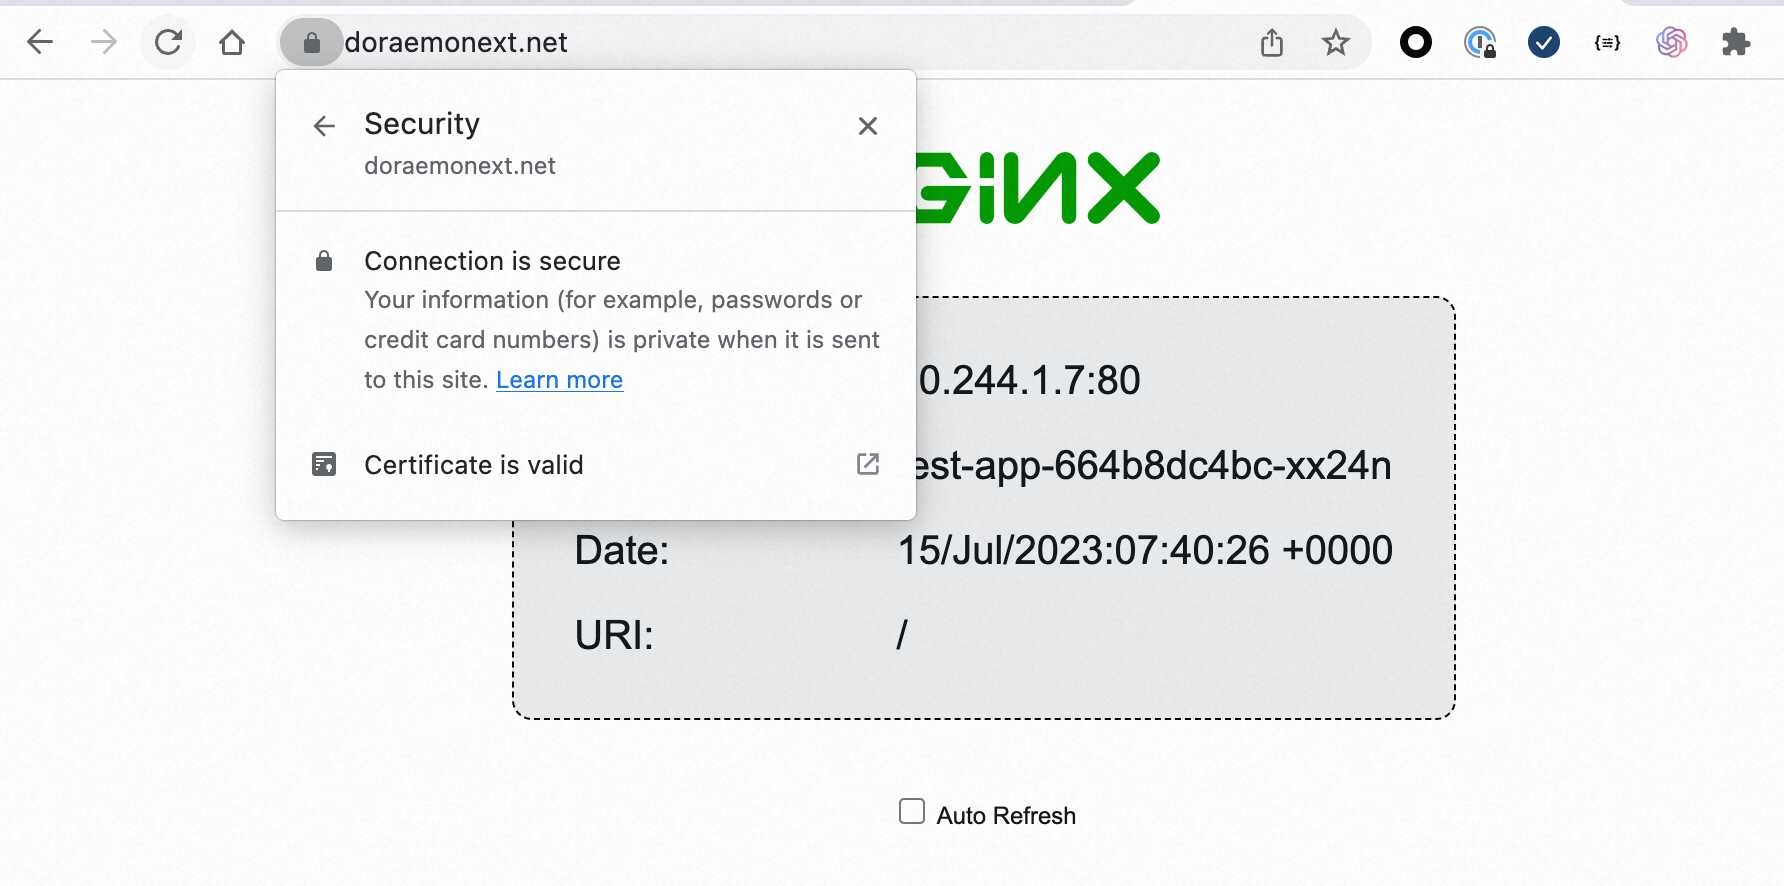
这次我们再次用 https 打开浏览器:
会发现证书已经生效了。
接下来我们需要将 80 直接强制跳转到 443,毕竟都有证书了,怎么还能继续用 80。
重新修改一下刚才的 Istio VirtualService 文件:
apiVersion: networking.istio.io/v1alpha3
kind: VirtualService
metadata:
  name: hello-virtual-service
  namespace: default
spec:
  hosts:
  - "doraemonext.net"
  gateways:
  - istio-system/hello-gateway
  http:
  - match:
    - port: 80
    redirect:
      authority: "doraemonext.net:443"
      scheme: https
  - match:
    - port: 443
    route:
    - destination:
        host: testpage
        port:
          number: 80
现在,我们就算使用 http://doraemonext.net 去访问,也会被强制跳转到 https://doraemonext.net 了。
Prometheus/Kiali 安装及可视化 Mesh 网络
都跑 Istio 了,不装个 Kiali 可视化就说不过去了:
kubectl apply -f https://raw.githubusercontent.com/istio/istio/release-1.18/samples/addons/prometheus.yaml
kubectl apply -f https://raw.githubusercontent.com/istio/istio/release-1.18/samples/addons/kiali.yaml
回到刚才我们的 istio-1.18.1 目录下,装一下官方的 demo,体验一下:
kubectl apply -f samples/bookinfo/platform/kube/bookinfo.yaml
kubectl apply -f samples/bookinfo/networking/bookinfo-gateway.yaml
官方的 Demo 默认给的都是 80 端口的,那我们肯定要和证书绑定一下。这里我提前设置了 bookinfo.doraemonext.net/kiali.doraemonext.net 的 A 记录指向了宿主机 IP。
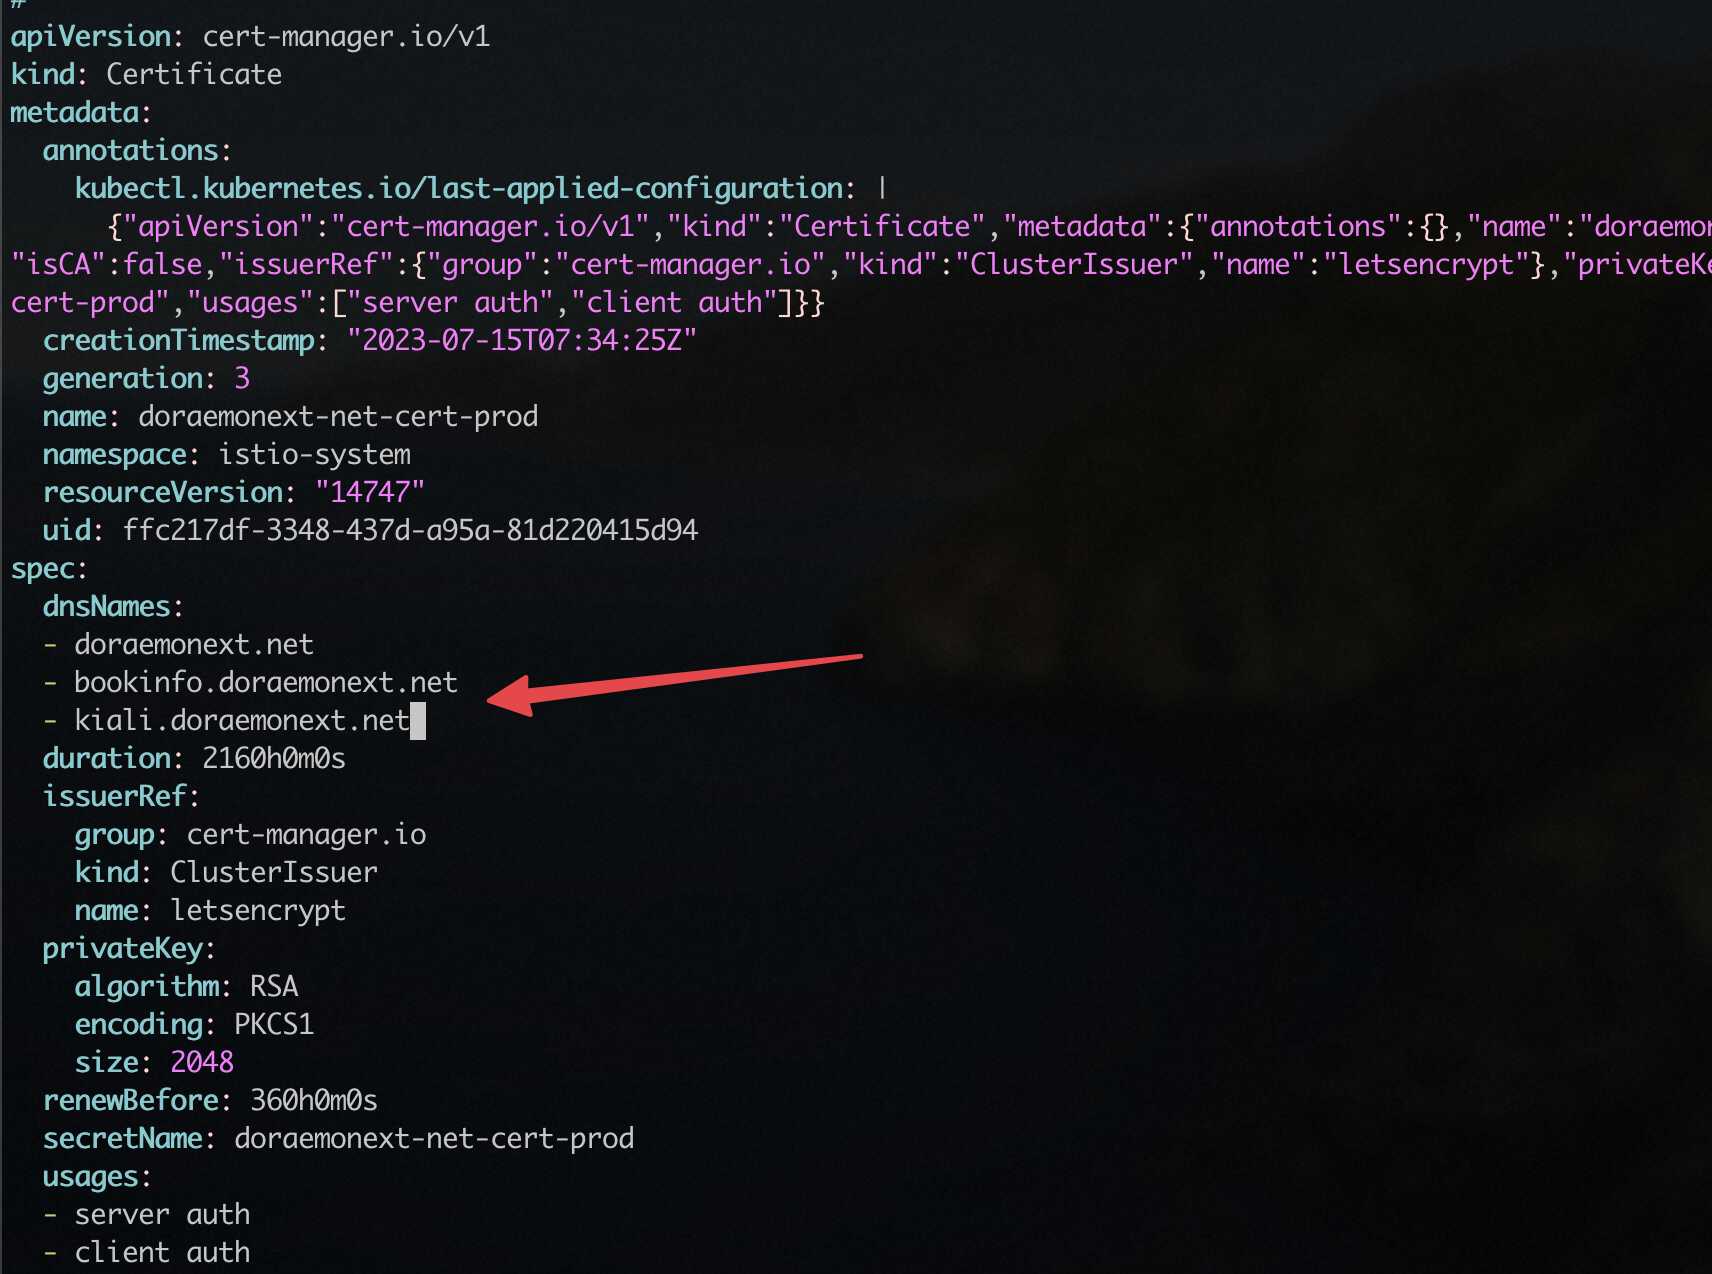
先申请 bookinfo.doraemonext.net 的证书。通过 kubectl edit cert doraemonext-net-cert-prod -n istio-system 打开刚才我们的证书 YAML,然后将其中的 dnsNames 增加一个 bookinfo.doraemonext.net/kiali.doraemonext.net:
然后再像刚才一样,通过 kubectl describe cert doraemonext-net-cert-prod -n istio-system 来观察 Events,稍等一会儿,看到下面的提示就是成功了:
接下来我们小小的改动一下官方示例中的网关文件: emacs samples/bookinfo/networking/bookinfo-gateway.yaml,主要是把 443 加上去:
  - port:
      number: 443
      name: https
      protocol: HTTPS
    tls:
      mode: SIMPLE
      credentialName: doraemonext-net-cert-prod
    hosts:
    - "bookinfo.doraemonext.net"
把上面的文件加到 bookinfo-gateway 下面,80 的后面一段即可,保存后重新 kubectl apply -f 即可生效,然后重新访问 https://bookinfo.doraemonext.net/productpage
接下来给 Kiali 加一下 Gateway 和 VirtualService 让它暴露到 kiali.doraemonext.net 上:
apiVersion: networking.istio.io/v1alpha3
kind: Gateway
metadata:
  name: kiali-gateway
  namespace: istio-system
spec:
  selector:
    istio: ingressgateway
  servers:
  - port:
      number: 443
      name: https-kiali
      protocol: HTTPS
    tls:
      mode: SIMPLE
      credentialName: doraemonext-net-cert-prod
    hosts:
    - "kiali.doraemonext.net"
---
apiVersion: networking.istio.io/v1alpha3
kind: VirtualService
metadata:
  name: kiali-vs
  namespace: istio-system
spec:
  hosts:
  - "kiali.doraemonext.net"
  gateways:
  - kiali-gateway
  http:
  - route:
    - destination:
        host: kiali
        port:
          number: 20001
---
apiVersion: networking.istio.io/v1alpha3
kind: DestinationRule
metadata:
  name: kiali
  namespace: istio-system
spec:
  host: kiali
  trafficPolicy:
    tls:
      mode: DISABLE
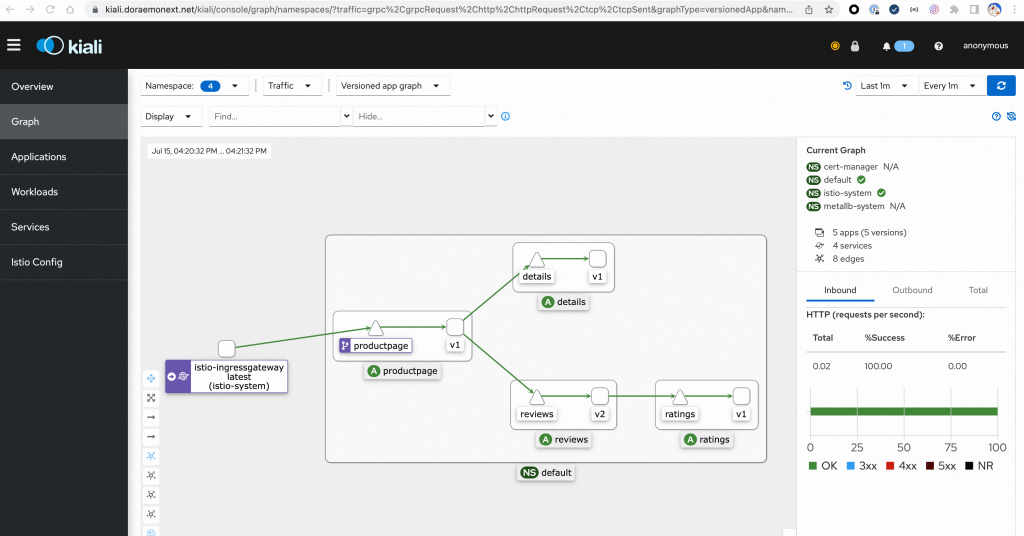
然后访问下 https://kiali.doraemonext.net ,整个服务的网络拓扑图就出来了:
折腾了这么多,才跑了 48% 的内存:
给狗老板打 call 😋












大佬您好,向您请教一个问题
gateway x.x.x.254 # 独立服务器 IP 的前面三段 + 最后一段是 254 这个独立服务器IP指的是什么?
我的环境是单网卡主机,物理网卡桥接到vmbr0上,我的这个环境 独立服务器IP指的是什么 ?
十分感谢!!!
пластиковые флаконы
Флаконы оптом пользуются высоким спросом среди предпринимателей. На рынке представлено множество моделей флаконов, которые могут удовлетворить различные запросы.
Качество и материал флаконов — ключевые факторы при оптовых закупках. Среди производителей можно найти как стеклянные, так и пластиковые флаконы.
Упаковка флаконов играет значительную роль в процессе выбора оптовых поставок. Индивидуальная упаковка флаконов может сделать продукцию более привлекательною для конечного потребителя.
При выборе флаконов оптом стоит обратить внимание на цены, чтобы оптимизировать расходы. Анализ цен на флаконы оптом у разных компаний позволит сэкономить средства.